|
|

Editor help movies
5 Step 4 - Groups and Items
5.1 Background
One of the most powerful features of the online website creation tool is the way that products or specific items that are to be displayed on the website are handled.
Whether you are interested in displaying a fully coded set of stock that you want your clients to buy, or perhaps you want to display photographs or images that might be of interest to your customers, our systems make it simple to group the items together and display in a consistent format.
5.2 What is a group?
Put simply a group is a collection of items. You can group together similar products or items and allow your customers to view numerous items at any one time.
For example if you run a business selling handbags and jewellery you might wish to group all the handbags together so that you customer could see them all at once. However if the number of products that you sell is high you will need to split the bags and jewellery into different categories so that your customers can choose a category and then view all the products in the category.

You can see from the example above that this client has created 9 separate groups which represents a separate group from each category of product.
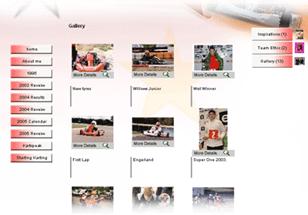
In the example below the client has uploaded photographs into separate groups.
5.3 The group management screen
When you click the [Step4 - Groups and Items] button, you will see a screen something like the image shown below:
This table displays all the groups for your website.
There are a number of icons and information available for each group
5.3.1 Settings
![]() If you click the settings icon a new screen appears that allows you change settings for this group
If you click the settings icon a new screen appears that allows you change settings for this group
5.3.2 Hide
![]() If you click the Hide icon you can prevent a group button from being displayed on your webpage.
If you click the Hide icon you can prevent a group button from being displayed on your webpage.
5.3.3 Delete
![]() If you click the Delete icon the group and all its content will be permanently removed
If you click the Delete icon the group and all its content will be permanently removed
5.3.4 Items
![]() The number of items in this group is shown in the Items column.
The number of items in this group is shown in the Items column.
5.3.5 New Item
![]() If you click the new item a new screen will appear that lets you enter all the information for a new item within this group.
If you click the new item a new screen will appear that lets you enter all the information for a new item within this group.
5.4 Creating a group
To create a new group:
- Login to your website
- Click the [Step4 - Groups and Items] button at the top of your webpage
- You will then see a page that looks something like the image below

Type in the name of a new group in the input box at the top of the screen and click the [New Group] Button
You will then be prompted to confirm that you wish to create a new group with a message similar to that shown below. Click the button [Create a New Group].
- If you now click the [Step4 - Groups and Items] button at the top of your page you will see that the new group has been created and a new entry appears in the table.
If you view your website and then click on the Home button you will see that a new group button has been added on the right of your webpage:
5.5 Deleting a group
Although it is simple to delete a group a word of warning is required. If you delete a group, all items within that group will also be permanently removed.
To delete a group
- Login to your website
- Click the [Step4 - Groups and Items] button
- Choose the group from the table shown and click on the delete icon

- You will then be prompted to confirm that you do wish to delete the group and all the items within the group permanently
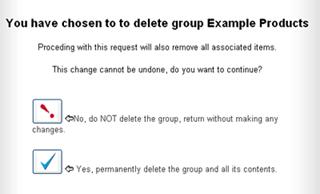
If you wish to proceed click the blue Tick.
5.6 Change group settings
There are a number of settings that you can change on each of your groups. To change any of these settings you can either click the settings ![]() icon for the group you wish to change or click
icon for the group you wish to change or click ![]() Icon for the group you wish to change.
Icon for the group you wish to change.
If you click any of these icons, the following screen is displayed:
Change group name
5.7 Changing the group name
If you want to rename your group simply type in a new name in this screen. Note there is no limit on the length of group name. Discretion should be used as the name has to fit inside a small button. A name length of less than 16 characters is recommended.
![]()
5.8 Change the order in which the groups are displayed (left buttons)
By default all groups on your website will be displayed in the order in which they were created. This may not be ideal, for example you may wish to create a group that appears at the top of the list.
The systems make it possible to do this by allowing you to change the value of a parameter called [Position in List].
![]()
It is important to understand that system applies the following rule when ordering the buttons :
- first it orders the buttons by using the [Position in List] parameter (lowest number first)
- if two buttons have the same value then the order in which they are created is then taken into consideration.
All new groups created are created with a [Position in List] value of '1'.
It is important to note that the system will apply a relative weighting to the order of the groups. (for example if there are three buttons having [Position in List] values of 5,6 and 7 respectively then a new group created with a [Position in list] value of say '4' would appear at the top of the list because it is the lowest number, not at position 4 as you might expect.
5.9 Hide the group
Every time you create a new group a navigation button appears on the right of your site that allows your visitors to see all the items in the the group you have created.
However, There may be situations where you do not want all your groups displayed.
For example you may have a Special Offers or a seasonal group that is only displayed for a specific period of time. If you have lots of groups you may not want a long list of groups cluttering up all your website. You might also wish to create a 'User Journey' that forces the user to view groups in a certain order.
In such cases you will want to Hide the group and suppress the creation of a group button for that page.
It is simple to do this. Just click the appropriate radio button as shown below.
![]()
5.10 What is an item ?
An item is anything that you want to display to you clients that can be combined into a group. For example items might be a products, pictures, items on a menu, services, delivery options, sponsors or even resellers of your products.
In fact an item can be anything that you would ant to display on its own page with descriptive text and a picture.
The system handles items in a very powerful and unique manner. As you have seen when a group button is clicked, the entire group of items is displayed. However, your clients want to see more information and a bigger picture than is displayed on this screen.
This system lets your visitor click the thumbnail image to display a great deal more information about that product. The system then generates a dedicated webpage which describes the item in great detail.
5.11 Creating a new item
Before you can create an item you must first create a group for that item. Once you have created a group, there are two ways to opening the page that creates a new item.
5.11.1 Option1 - from the group table
- Login to your website
- Click the [Step4 - Groups and Items] button.
- Click the
 icon
icon
5.11.2 Option2 - from the items page
- Login to your website
- Click the [Step4 - Groups and Items] button.
- Click on the name of the group to display the item list similar to the page shown below
- Click on the [Create a New Item] button
5.12 New Item Screen
The New Item Screen lets you enter all the required information for a New Item.
The system will automatically adjust the way that the item is displayed depending on the information you choose to enter.
5.12.1 Select a Picture
You must add an image to each item you create. To upload an image click on the [Browse] button at the top of the screen. You will then be able to choose an appropriate picture from your computer.
( TIP the final picture size will be 270pixels X 270pxels). If you upload an image that is bigger then 270x270 the system will shrink it and there will be no problems. However, if your image is smaller than this the system will still expand it to fit in the 270x270 box. If your image is very small this may result in a very poor quality image. It is recommended that the image you upload is at least 270x270 pixels)
5.12.2 Text description
The editing area allows you to enter as much text as you wish to describe the item. You have full text formatting and editing capability with our advanced editor.
TIP. Use Arial 10pt for the main body text. This is the most readable, standard internet font.
5.12.3 Item Name and Group
Enter a name for the item in the test entry box..
![]()
The group pick list also enables you to move the item between groups.
5.12.4 Item row and column
When the items are displayed in the group view they are displayed in a 3 column matrix as shown in the image below.
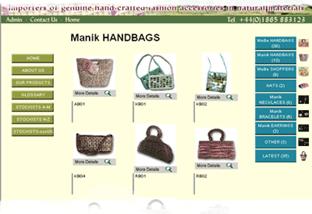
 It is possible to arrange the items inside this matrix manually. You can choose the column and the row to display the item:
The drop down menu also lets you hide the item within the group. This is can be useful if for example you run out of stock of a particular item or perhaps it is a seasonal item that you only wish to display at certain times of the year.
5.12.5 Item code
You can add a unique code to the item. This code will be displayed in the group view and the detailed item view on your website. If you choose not to enter an item code nothing will be displayed.
![]()
5.12.6 Item price and currency
If it is appropriate, you can input a price for the item by entering a value in the price text entry box.
Warning - this must be a numerical value

You can choose the currency of an item by selecting the currency from the currency symbol pick-list.
TIP The system is not multi-currency. If you choose a currency for one product, all products will be the same currency. You can cannot have different currencies for different items.
| User guide | Link guide | Image guide | Buy guide |