|
|

Editor help movies
3 Step 2 - Style and Layout
3.1 Background
Our systems lets you change the style and design of your site without changing the content and change the content of your site without changing the design.
You can look through the design library and select a design that you like. Simply select a new design and your content stays the same.
To change the style of your website click the Step-2 button at the top of your web-page. Once you click this button you will be able to choose a design you require.
3.2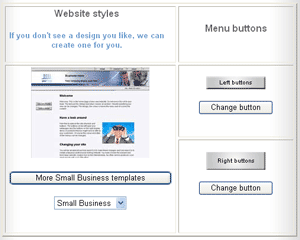 The style layout screen
When you click step2 you will see the screen below.
The left of the screen lets you choose a template.
The right of the screen allows you to select a button colour that suits the design and your colour scheme.
3.3 Select a template design
The first step is to select a template design.
On the left of the screen you will see a small 200pixel thumbnail of the design that you are currently using for your website design.
Above this design, you will see a short message informing you that a customised template can be created for you.
Directly beneath the thumbnail is a button that opens up the library of designs in the same category as the template being used. E.g. If you are currently using a template from, say the Small Business category, the button will read 'More Small Business Templates'.
The template designs are arranged into categories. Each category can be chosen from the pick list. There are a number categories to choose from. The main two categories are 'Fast and Simple' or 'Small Business' categories.
You can either choose a category from the drop down menu or click the button beneath the thumbnail. You can then select a design from the list displayed.
 To select a design simply click the word [select] next to the image you require and your whole site will change.
To see the effect of the changes just click [test your website] button.
You can do this as many times and as often as you like.
3.4 Select a button design
Your website uses navigation buttons to enable your customers to view your webpages and any products you display.
3.4.1 Left Buttons
The button on the LEFT are standard website navigation buttons. A 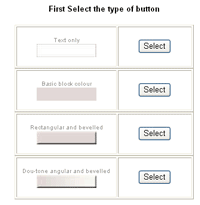 button is automatically created when you create a webpage and automatically removed when webpage is deleted. There are a number of button styles to choose from. Once the button style has been selected you can choose the colour of the button for your website.
To change the buttons click [Change Button] at the top of the right pane.
You will then be prompted to select a type of button. Click [Select] to choose the type of button you require.
After selecting the type of buttons you require you can then choose from several pages of coloured buttons. Choose one that matches the colours in your template and the colour scheme of your website
3.4.2 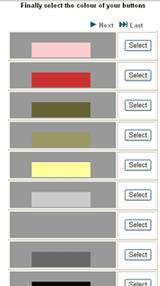 Right Buttons
The buttons on the RIGHT enable your visitors to view the groups (or categories) of products or items that you have entered.
Each time you create a category, you also created a new button. Each time you delete a category the button is removed.
To change the buttons click [Change Button] at the bottom of the right pane.
You will then be prompted to select a type of button and colour of button in the same way as you did for the left buttons.
After selecting the type of buttons you require you can then choose from several pages of coloured buttons. Choose one that matches the colours in your template and the colour scheme of your website
| User guide | Link guide | Image guide | Buy guide |